
In today’s tutorial, I will be showing you how to create a custom dropdown menu using CSS and JS.
Why create a custom dropdown menu?
HTML already has a built-in dropdown menu (the select tag) that doesn’t require much additional work to use. The dropdown box can be styled, but not the menu. Based on your browser, it might not look nice and you would want to create your own that can be styled however you wish. Another reason is because you can add additional functionality if needed.
Prerequisites
- A text editor to write your code (I’m using Visual Studio Code)
- Make sure you have HTML, CSS, and JavaScript files linked together using
linkandscripttags in your HTML.
Create the dropdown menu
In your HTML file, create the dropdown menu using the select tag. Here is my code:
<select id="mySelectMenu">
        <option value="item1" selected>Option 1</option>
        <option value="item2">Option 2</option>
        <option value="item3">Option 3</option>
        <option value="item4">Option 4</option>
        <option value="item5">Option 5</option>
    </select>
This code represents the original dropdown menu that will be converted into a custom one. The option elements represent each item in the dropdown menu. The selected attribute which item is selected by default.
When we preview our code, we will get a basic dropdown menu that is built into HTML.
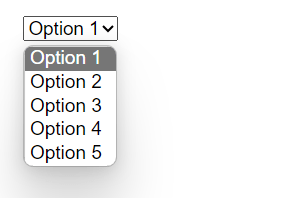
This looks boring, so we can use JavaScript to create our own menu.
Create our own dropdown menu to replace the original
The first step when creating our new dropdown menu is to replace the original with our new one.
// Get every select menu on the page
const selectMenus = document.querySelectorAll('select')
const dropdownIcon = `<svg width="24" height="24" viewBox="0 0 24 24" fill="none" xmlns="http://www.w3.org/2000/svg" class="icon">
<path d="M4.75 9.25L10.9393 15.4393C11.5251 16.0251 12.4749 16.0251 13.0607 15.4393L19.25 9.25" stroke="#212325" stroke-width="1.5" stroke-linecap="round" stroke-linejoin="round"/>
</svg>`

// Loop through each select menu
selectMenus.forEach(el => {
    if (!el.hasAttribute('keep-default')) {
        // Hide the original select menu
        el.style.display = 'none'

        // Create the new select menu
        const newEl = document.createElement('div')
        newEl.className = 'selectBox'
        // Preserve the original classes
        for (let attr of el.classList) {
            newEl.classList.add(attr)
        }
        el.parentElement.append(newEl)

        // Create the new select menu's inner elements
        const box = document.createElement('div'),
            label = document.createElement('span'),
            menu = document.createElement('div')
        box.className = 'selectBox'
        label.className = 'selectLabel'
        menu.className = 'selectMenuOptions'

        box.innerHTML = dropdownIcon
        box.insertBefore(label, box.querySelector('.icon'))

        newEl.append(box, menu)
    }
})
The code above loops through every select menu on the page and creates a custom one to replace each of them. The new dropdown menu consists of the select box, which includes a label and the icon, and the popup, which is currently empty.
Populate the dropdown popup
Our next step is to, of course, add every item to the new dropdown menu inside our popup. Add the following code at the end of our if statement:
for (const o of el.options) {
    const opt = document.createElement('div')
    opt.className = 'option'

    opt.innerHTML = o.innerHTML
    opt.setAttribute('value', o.value)
    opt.setAttribute('selected', o.selected)

    menu.append(opt)
}
The code above will loop over each item in the original select box and add it to our custom dropdown’s popup (box).
When we preview our code, we will see our icon with our options under it!

Style the dropdown menu
This dropdown looks very dull, so let’s style it. You can customize it however you like, but here is my styling:
* {
    font-family: Inter, sans-serif;
    box-sizing: border-box;
}

body {
    padding: 20px;
    font-size: 16px;
}

.selectMenu {
    position: relative;
    min-width: 250px;
    width: fit-content;
}

.selectBox {
    display: flex;
    border: 1px solid #eee;
    border-radius: 14px;
    padding: 12px 15px;
    gap: 15px;
    align-items: center;
    justify-content: space-between;
    transition: .15s;
}

.selectBox:hover {
    box-shadow: 0 4px 10px rgba(100, 100, 100, .1);
}

.icon {
    width: 20px;
    height: 20px;
    transition: .2s;
}

.selectMenuOptions {
    position: absolute;
    display: flex;
    top: calc(100% + 10px);
    flex-direction: column;
    gap: 5px;
    width: 100%;
    left: 0;
    border: 1px solid #eee;
    border-radius: 14px;
    background: #fff;
    padding: 8px;
    box-shadow: 0 4px 10px rgb(0, 0, 0, .03), 0 10px 40px rgba(100, 100, 100, .2);
    display: none;
}

.option {
    width: 100%;
    border-radius: 8px;
    padding: 12px 15px;
    transition: .15s;
}

.option:hover {
    background: rgb(0, 0, 0, .03);
}

.option.selected {
    background: #2e66fe;
    color: #fff;
}

.selectMenu.open .icon {
    transform: rotate(180deg);
}
Handling clicks on the page
Now our dropdown menu looks like one! Our next step is to handle when the select box is clicked to open our menu, and closing the menu when anything on the page is clicked. Paste the following code inside the if statement:
box.addEventListener('click', (e) => {
    // Prevent the menu from automatically closing
    e.stopPropagation()
    menu.style.display = 'flex'
    newEl.classList.add('open')
})

window.addEventListener('click', (e) => {
    if (newEl.classList.contains('open')) {
        menu.style.display = ''
        newEl.classList.remove('open')
    }
})
This code will detect when the dropdown menu is clicked and if anything is clicked, close the dropdown menu.
Selecting items from the dropdown
Finally, we need to set the dropdown’s value when an item is clicked from the options. Inside our for loop iterating over our items, below our append() function, add the following lines of code:
opt.addEventListener('click', () => {
    if (menu.querySelector('.option.selected')) {
        menu.querySelector('.option.selected').classList.remove('selected')
    }
    opt.classList.add('selected')
    newEl.setAttribute('value', o.value)
    label.innerHTML = opt.innerHTML
})
if (o.selected) {
    opt.click()
}
This code will automatically select the item associated with the original option item with the selected attribute, and when we click the item, set it as the value of the dropdown menu.
Final result
Our dropdown menu is now complete! You can now open the menu, select items, and set it as the value.

Complete code
Here is the complete code for this project:
HTML
<!DOCTYPE html>
<html lang="en">
<head>
    <meta charset="UTF-8">
    <meta name="viewport" content="width=device-width, initial-scale=1.0">
    <title>Custom Dropdown Menu</title>
    <link rel="stylesheet" href="style.css">
</head>
<body>
    <select id="mySelectMenu">
        <option value="item1">Option 1</option>
        <option value="item2">Option 2</option>
        <option value="item3">Option 3</option>
        <option value="item4">Option 4</option>
        <option value="item5">Option 5</option>
    </select>
    <script src="main.js"></script>
</body>
</html>
CSS
* {
    font-family: Inter, sans-serif;
    box-sizing: border-box;
}

body {
    padding: 20px;
    font-size: 16px;
}

.selectMenu {
    position: relative;
    min-width: 250px;
    width: fit-content;
}

.selectBox {
    display: flex;
    border: 1px solid #eee;
    border-radius: 14px;
    padding: 12px 15px;
    gap: 15px;
    align-items: center;
    justify-content: space-between;
    transition: .15s;
}

.selectBox:hover {
    box-shadow: 0 4px 10px rgba(100, 100, 100, .1);
}

.icon {
    width: 20px;
    height: 20px;
    transition: .2s;
}

.selectMenuOptions {
    position: absolute;
    display: flex;
    top: calc(100% + 10px);
    flex-direction: column;
    gap: 5px;
    width: 100%;
    left: 0;
    border: 1px solid #eee;
    border-radius: 14px;
    background: #fff;
    padding: 8px;
    box-shadow: 0 4px 10px rgb(0, 0, 0, .03), 0 10px 40px rgba(100, 100, 100, .2);
    display: none;
}

.option {
    width: 100%;
    border-radius: 8px;
    padding: 12px 15px;
    transition: .15s;
}

.option:hover {
    background: rgb(0, 0, 0, .03);
}

.option.selected {
    background: #2e66fe;
    color: #fff;
}

.selectMenu.open .icon {
    transform: rotate(180deg);
}
JavaScript
// Get every select menu on the page
const selectMenus = document.querySelectorAll('select');
const dropdownIcon = `<svg width="24" height="24" viewBox="0 0 24 24" fill="none" xmlns="http://www.w3.org/2000/svg" class="icon">
<path d="M4.75 9.25L10.9393 15.4393C11.5251 16.0251 12.4749 16.0251 13.0607 15.4393L19.25 9.25" stroke="#212325" stroke-width="1.5" stroke-linecap="round" stroke-linejoin="round"/>
</svg>`

// Loop through each select menu
selectMenus.forEach(el => {
    if (!el.hasAttribute('keep-default')) {
        // Hide the original select menu
        el.style.display = 'none'

        // Create the new select menu
        const newEl = document.createElement('div')
        newEl.className = 'selectMenu'
        // Preserve the original classes
        for (let attr of el.classList) {
            newEl.classList.add(attr)
        }
        el.parentElement.append(newEl)

        // Create the new select menu's inner elements
        const box = document.createElement('div'),
            label = document.createElement('span'),
            menu = document.createElement('div')
        box.className = 'selectBox'
        label.className = 'selectLabel'
        menu.className = 'selectMenuOptions'

        box.innerHTML = dropdownIcon
        box.insertBefore(label, box.querySelector('.icon'))

        newEl.append(box, menu)

        for (const o of el.options) {
            const opt = document.createElement('div')
            opt.className = 'option'

            opt.innerHTML = o.innerHTML
            opt.setAttribute('value', o.value)
            opt.setAttribute('selected', o.selected)

            menu.append(opt)

            opt.addEventListener('click', () => {
                if (menu.querySelector('.option.selected')) {
                    menu.querySelector('.option.selected').classList.remove('selected')
                }
                opt.classList.add('selected')
                newEl.setAttribute('value', o.value)
                label.innerHTML = opt.innerHTML
            })
            if (o.selected) {
                opt.click()
            }
        }

        box.addEventListener('click', (e) => {
            // Prevent the menu from automatically closing
            e.stopPropagation()
            menu.style.display = 'flex'
            newEl.classList.add('open')
        })

        window.addEventListener('click', (e) => {
            if (newEl.classList.contains('open')) {
                menu.style.display = ''
                newEl.classList.remove('open')
            }
        })
    }
})
Check out my coding/tech channel!
For more coding tutorials like this, check out my YouTube channel, @ProCodeSoftware, where I will be posting tech and coding videos!

Leave a comment